
Using Containers to Build a Turnkey Dev Environment
Containers have been around since the early 1980s, when chroot was used in Unix v7 to achieve somewhat weak process isolation, but first found commercial application in the form of FreeBSD Jails in early 2000. The popularity of this paradigm exploded in 2013 with the advent of Docker, which introduced a whole ecosystem and platform to manage the life cycle of containers and container images. A container isn’t anything more than a collection of system processes that have their own directory (namespace) and resource allocation. They are like a lightweight virtual machine but share the same kernel as the underlying operating system.
On the other hand, a developer environment is a paradigm that is closely tied to virtual machines; it is a host machine (or usually a VM) that has the full developer toolchain required to develop a particular application. Not only does this speed up the development process, but also enables developers to make sure they develop in an environment similar to production with reproducible and consistent results.

Why Are Containers Important for Community-Driven Projects?
Given the proliferation of container technology, we have recently seen many developers using a container as their developer environment. The minimal overhead that a container requires versus a full-blown VM is very advantageous, as it enables the developer to have multiple containers running simultaneously, thereby achieving process isolation without requiring more powerful machines. Moreover, with the existence of DockerHub, the developer needs only to download the container and run it, just like running a VM image or a Vagrant file. It’s that easy. With community-focused, open source projects, it is particularly important to enable contributors in any way we can. We want to lower the barrier of entry for code contributions as much as possible, so that the user is empowered to improve the project for everyone, without having to battle with toolchains. Here, we have created a Netdata devenv container. Let’s see how we did it.
Let’s Create the Container
Everything starts with Dockerfile, the blueprint that will define our developer environment container. We selected Ubuntu as the base image of the container, since it’s a stable and very common Linux distribution. At this point, we don’t care that much about container file size, so we won’t use Alpine, though it is often suggested for Docker containers.
![]()
Next, using the package manager of the Linux distribution, we install all the packages and tools that we want. It is possible that some tools do not exist as binary packages. That’s OK; in the following steps, we manually download a binary using wget, make it executable and place it inside /bin.
The choice of tools is a particularly important discussion, since it will greatly influence the developer experience. We want to include:
- All the tools developers use to verify the quality of the code, such as linters.
- All the developer utility tools such as git, curl, wget, etc.
- Any other developer tool, such as Vim.
It is possible to define special configurations for these tools. We can include, for example, the configuration file for Vim, so that it comes with linters, highlighters and any other customization we need, ready to be used.

Finally, we download all the dependencies for the project itself, so that the user can easily build it from source. Here at Netdata, we include an installer script in the netdata/netdata repository, so we just use wget to download and execute it right away.

Each container image must contain at least an ENTRYPOINT or CMD instruction, which tells Docker what command it should execute inside the container when launching it. Since we don’t want to run a particular program, but instead want the container to rest “idle,” we run an endless loop.
![]()
Using the Developer Container
Given the ENTRYPOINT instruction that we have defined, we intend the container to be persistent in the background, so that we can access it whenever we want.
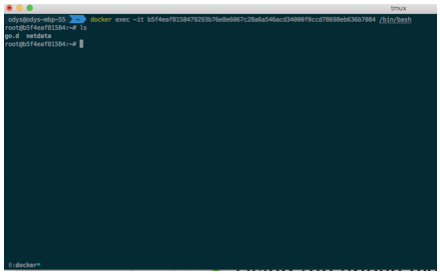
When we want to develop, we run docker exec -it /bin/sh <container_id>, which will execute a new process inside the container, namely /bin/bash. The flags “-it” are used to indicate to Docker that we want to access the STDIN/STDOUT of the container and attach a terminal driver. This results in something like a connection to a host machine.
How to Access the Container’s Filesystem
While we have managed to get a shell inside the container, it is not always handy to use a command line to develop, as developers are increasingly familiar with IDEs and code editors.
Visual Studio Code, one of the most popular code editors out there, ships an existing extension which enables the user to treat containers as remote hosts, ssh into them, and get full access to the filesystem, all within VS Code itself. It is called Remote Containers, and it gives us a whole range of new possibilities.
Using the above extension:
- Run the devenv Docker container:
- Open VS Code, open command pallet, and run Remote-Containers: Attach to Running Container

- Visual Studio Code will open a new window attached to that particular running container. The user can now:
- Access the container’s filesystem easily from the left-hand menu and edit code in VS code.
- Use VS Code to get a terminal connection inside the Docker container.
- Install any VS Code extensions they want; for example, inside the container, since the locally installed extensions will not work.
A More Advanced Setup
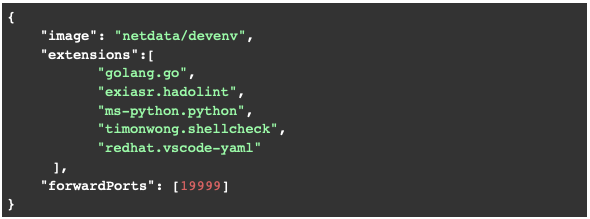
VS Code supports an even more sophisticated approach to developer environments in containers. We can define a devcontainer.json and place it inside a directory. Upon opening the directory with VS Code, it will pop up a message to reopen the directory from inside a container. It instructs VS Code regarding which
- Container to use; in our case, our developer environment
- Ports to expose, in our case: 19999
- VS Code extensions to install inside the container. Note that the extensions installed locally on VS code will not work unless they are installed inside the container.
Finally, since we are opening the directory inside the container, VS Code will automatically sync any file we place inside that directory.
Now, all we have to do is to place the directory and file inside any repository that we want to follow this flow, and the user only needs to access that repository and open the directory with VS Code. With the click of a button, it will reopen the repository from inside the container, ready to develop, with no dependencies to install.
What’s Next
We are now ready to package and vendor the developer environment to be used by our community of contributors. We can publish it on DockerHub and embed a .devcontainer/devcontainer.json file in our project’s repository. Community users will be glad to see that they don’t have anything to set up, other than downloading Docker and VS Code on their development machines. We eliminated unnecessary friction and made progress toward a more pleasant developer experience. We have published the devenv Dockerfile in our Community GitHub repository, and we are looking forward to your feedback and ideas. Simply open a GitHub issue or better still, make a PR.
