
Inside the Packet: How Kubernetes Networking Actually Works at L3/L4

Most Kubernetes tutorials explain networking with boxes and arrows: Pod A talks to Pod B. But what happens inside those arrows? Which Linux kernel subsystems move the packet? How does a Service IP — which exists on no interface — actually route traffic?
I spent two weeks tracing packets through a live Kubernetes cluster using tcpdump, ip route, iptables-save, conntrack and bpftool. This article is the result — a layer-by-layer breakdown of the Kubernetes networking dataplane with real packet captures, kernel data structures and architecture diagrams.

If you operate Kubernetes in production and have ever debugged a networking issue by guessing, this article will replace guesswork with understanding.
The Networking Model: Three Guarantees
Kubernetes networking is built on three non-negotiable rules:
- Every Pod gets its own IP address — no NAT between Pods
- All Pods can reach all other pods without NAT — regardless of which Node they are on
- Agents on a Node can communicate with all Pods on that Node
These rules sound simple. Implementing them requires orchestrating multiple Linux kernel subsystems across every Node in the cluster.
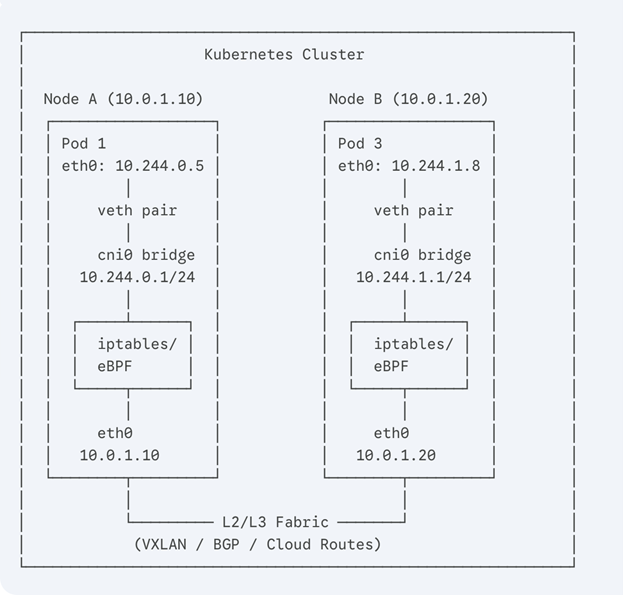
Figure 1: The Kubernetes Dataplane architecture, showing the path from Pod veth pairs through the Linux Bridge and into the L2/L3 fabric.
Let us trace a packet through each hop.
Layer 1: Pod Network Namespace and Veth Pairs
Every Pod runs in its own Linux network namespace. This gives it an isolated networking stack its own interfaces, routes, iptables rules and ARP table.
The Pod connects to the Node through a veth pair — a virtual Ethernet cable with one end inside the Pod namespace and one end on the Node.
Seeing it in Action
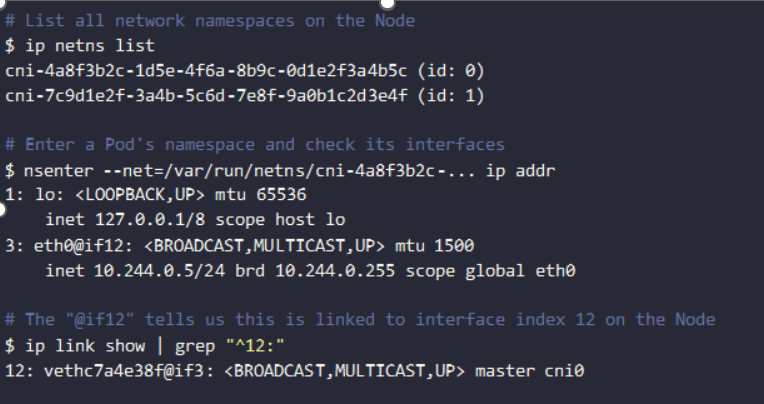
The key insight: eth0@if12 inside the Pod is connected to vethc7a4e38f@if3 on the Node, and that veth is attached to the cni0 bridge. This is how the packet exits the Pod.
The Route Table Inside the Pod

The Pod has two routes:
Anything in 10.244.0.0/24 (same Node) → send directly via eth0
Everything else → send to 10.244.0.1 (the bridge), which is the Node’s gateway
Layer 2: the Bridge — Local Pod-To-Pod
The cni0 bridge acts like a virtual switch. All Pods on the same Node connect to it:
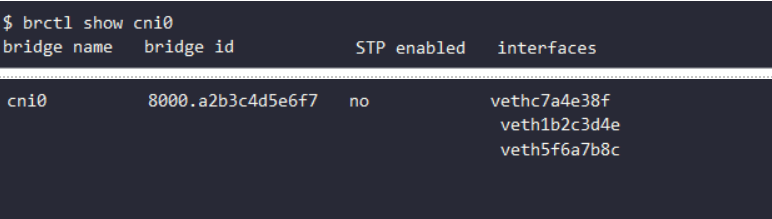
Same-Node Pod-To-Pod Packet Flow
When Pod 1 (10.244.0.5) sends a packet to Pod 2 (10.244.0.6) on the same Node, the bridge performs a MAC address lookup — purely Layer 2. No routing, no iptables, no NAT. This is the fastest path.
Capturing It
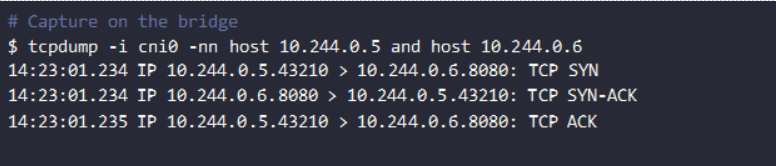
Clean TCP handshake, no rewriting. Pod IPs preserved end-to-end.
Layer 3: Cross-Node Routing — Where CNI Plugins Diverge
When Pod 1 (10.244.0.5 on Node A) talks to Pod 3 (10.244.1.8 on Node B), the packet must leave the Node. This is where CNI plugins make their architectural choice.
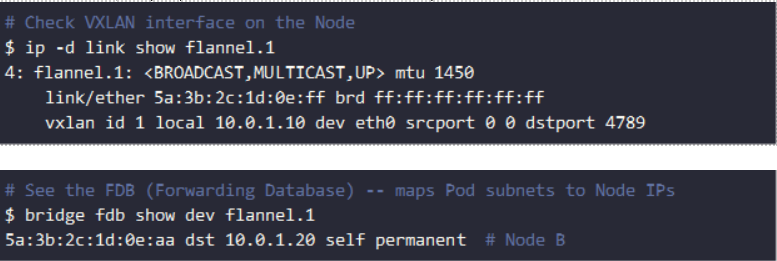
Option A: Overlay (VXLAN) — Flannel, Calico VXLAN Mode
The packet is encapsulated in a VXLAN header and sent as a UDP packet between Nodes:
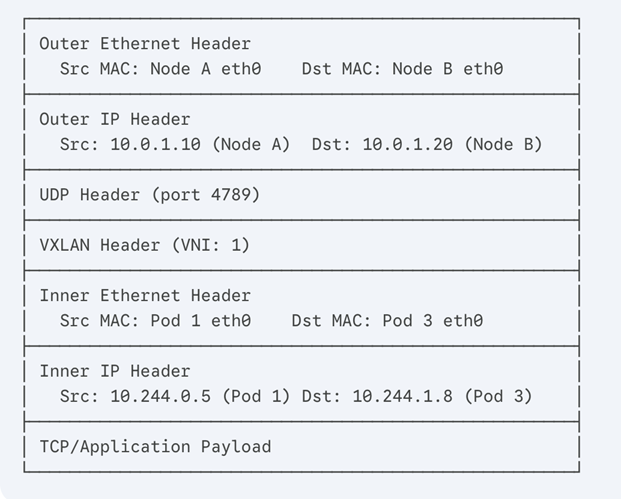
Figure 2: VXLAN Encapsulation adding 50 bytes of overhead (Outer Ethernet + Outer IP + UDP + VXLAN headers) around the original Pod-to-Pod packet.
Overhead: 50 bytes per packet. On a 1500 MTU network, your effective Pod MTU drops to 1450.
Option B: Native Routing (BGP) — Calico BGP Mode
No encapsulation. Each Node announces its Pod CIDR via BGP, and the infrastructure routes natively:

The proto bird tells you these routes were installed by the BIRD BGP daemon (Calico’s routing agent).
Advantage: Zero overhead. Full 1500 MTU. Wire-speed routing.
Requirement: The underlying network must support it (no restrictions on source IPs, or use IP-in-IP as fallback).
Option C: EBPF Dataplane and XDP — Cilium
Cilium bypasses iptables entirely and attaches eBPF programs directly to the network interfaces. For maximum performance, Cilium utilizes eXpress Data Path (XDP).
XDP allows eBPF programs to execute at the lowest possible point in the Linux network stack — directly inside the network driver before the kernel even allocates memory for the packet (sk_buff). This means Cilium can route packets, load balance Services or drop malicious traffic with near-hardware speeds.
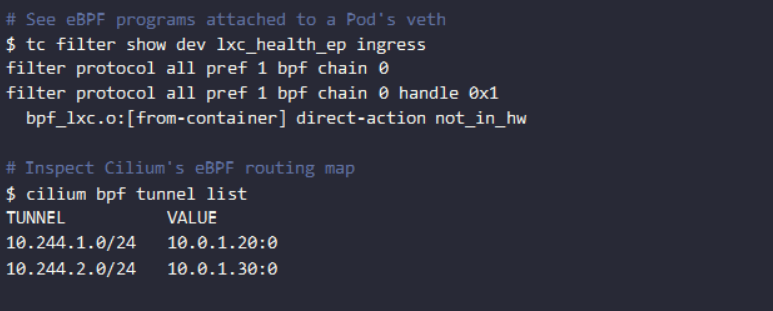
Cilium stores routing decisions in eBPF hash maps in kernel memory. These lookups are O(1) and bypass the entire Netfilter/iptables chain traversal, drastically reducing CPU overhead.
Layer 4: Services — the Invisible Load Balancer
A Kubernetes Service has a ClusterIP that exists on no physical or virtual interface. It is a fiction maintained by kube-proxy through iptables rules (or eBPF maps in Cilium).
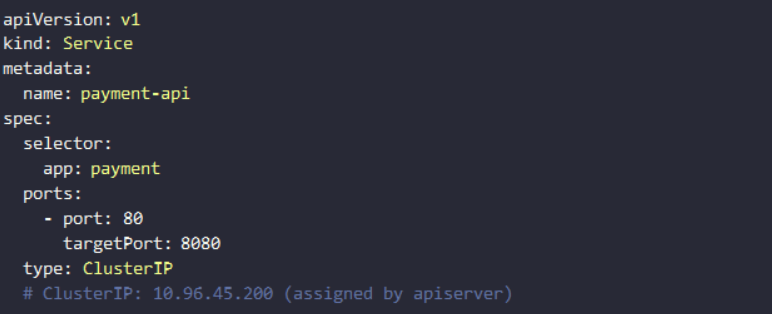
How Kube-Proxy Implements Services (iptables Mode)
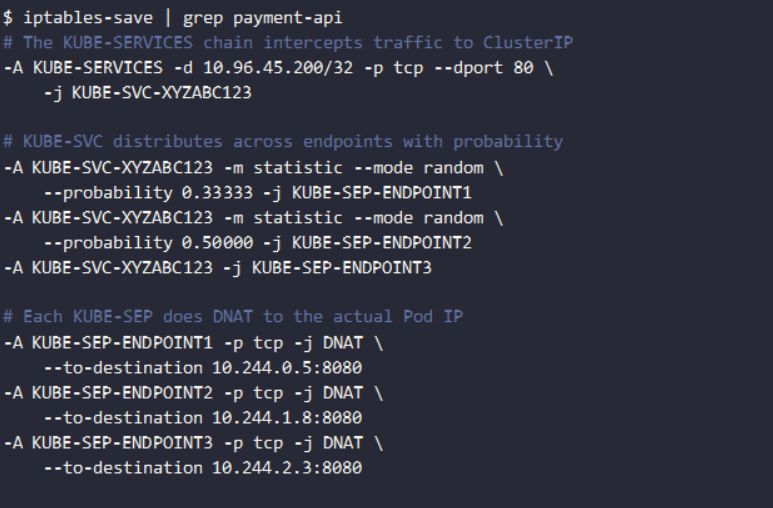
The probability math is clever: With 3 endpoints, the first rule fires 1/3 of the time. Of the remaining 2/3, the second rule fires 1/2 (= 1/3 total). The last rule catches the rest (1/3). Equal distribution.
The DNAT in Action
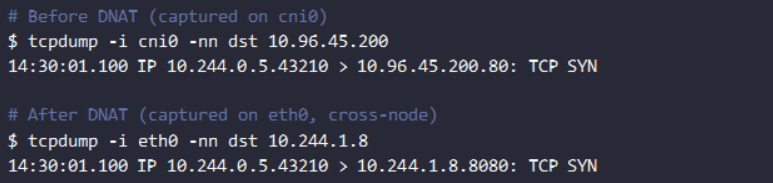
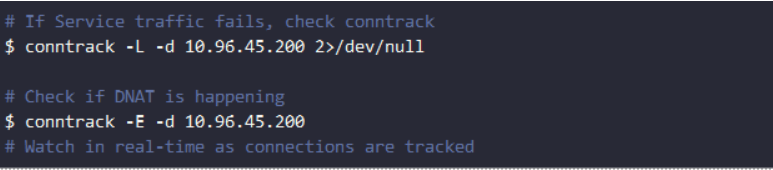
The destination changed from 10.96.45.200:80 to 10.244.1.8:8080. The conntrack table remembers this mapping for the return path:

The Iptables Scale Problem
Here is why this matters in production: Every Service creates ~8 iptables rules per endpoint. With 2,000 Services averaging 3 endpoints each, you get approximately 48,000 iptables rules. As iptables evaluates rules linearly, every new connection traverses these chains sequentially.
At 5,000+ Services, iptables rule updates alone can take 5+ seconds, causing a period where traffic may be misrouted. This is why large clusters move to IPVS mode or Cilium eBPF.
IPVS Mode: O(1) Service Lookup
IPVS (IP Virtual Server) uses IP sets and hash tables instead of linear chains:
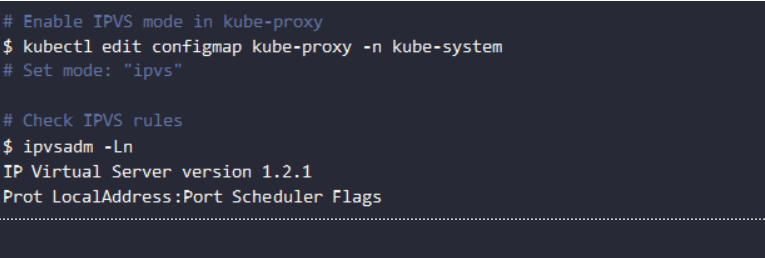
IPVS advantages:
O(1) lookups — hash table versus linear chain
Multiple algorithms — round-robin, least connections, weighted, source hash
Scales to 100,000+ Services without degradation
Debugging: the Toolkit
When networking breaks, here is the systematic approach:
Step 1: Verify Pod Connectivity
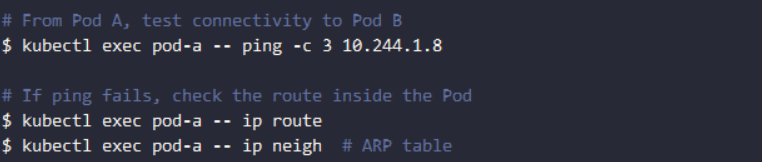
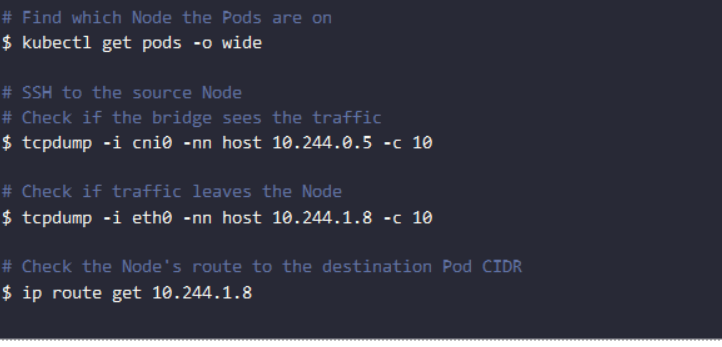
Step 2: Trace the Path on the Node
Step 3: Check Conntrack for Service Issues
Step 4: DNS — the Silent Killer and NodeLocal Caching
In Kubernetes, 80% of ‘networking issues’ are actually DNS issues. The default ndots:5 setting means any domain with fewer than 5 dots triggers a search list expansion. A lookup for api.stripe.com (2 dots) generates 5 DNS queries before resolving. In a standard setup, each of those 5 queries traverses the cross-node overlay network to hit CoreDNS, causing massive latency.
The Fix: Deploy NodeLocal DNSCache. This runs a lightweight DNS caching agent as a DaemonSet on every node. Pods send DNS queries to an ultra-fast local IP address (typically 169.254.20.10). The local cache handles the ndots:5 thrashing instantly, only traversing the overlay network for cache misses.
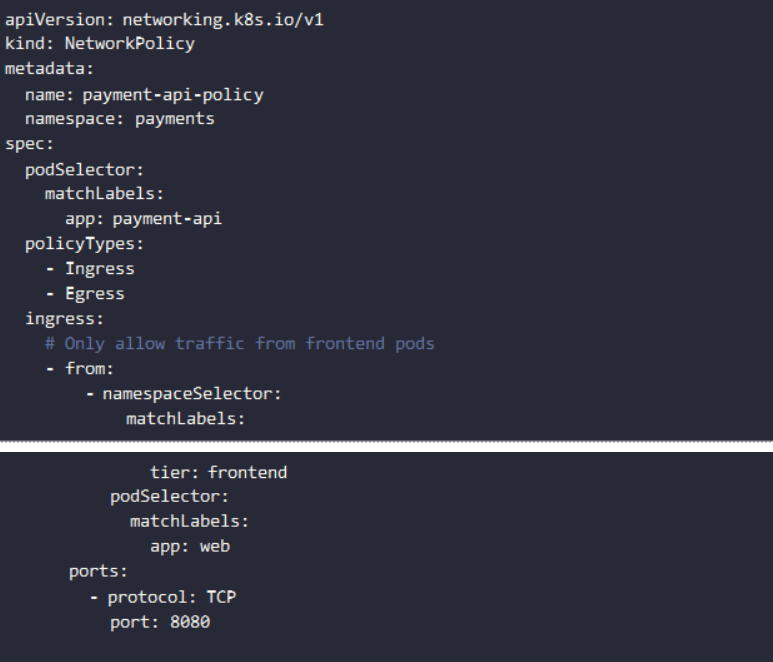
NetworkPolicy: Firewalling at the Pod Level
NetworkPolicy is Kubernetes’ native firewall, but it is only enforced if your CNI supports it (Calico, Cilium, Weave — not Flannel).
How Calico Implements NetworkPolicy
Calico translates NetworkPolicy into iptables rules on each Node:

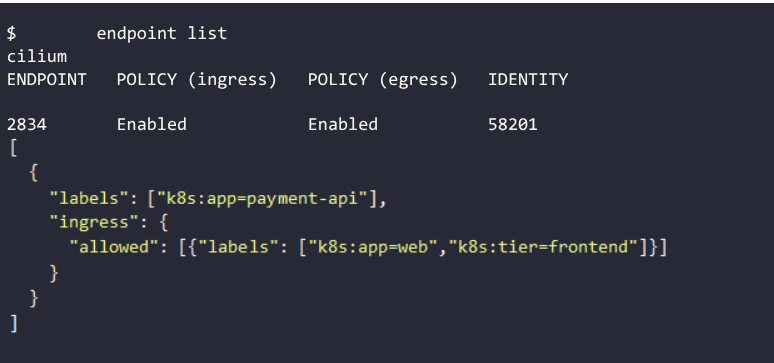
How Cilium Implements NetworkPolicy
Cilium compiles policies into eBPF programs — no iptables:
Performance Comparison: Iptables Vs. IPVS Vs. EBPF
Benchmarks from a 100-node cluster with 2,000 Services:
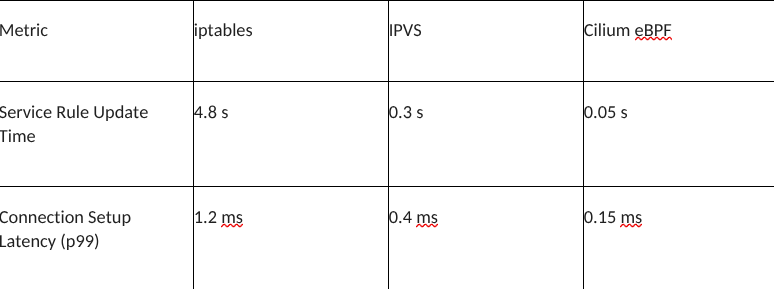
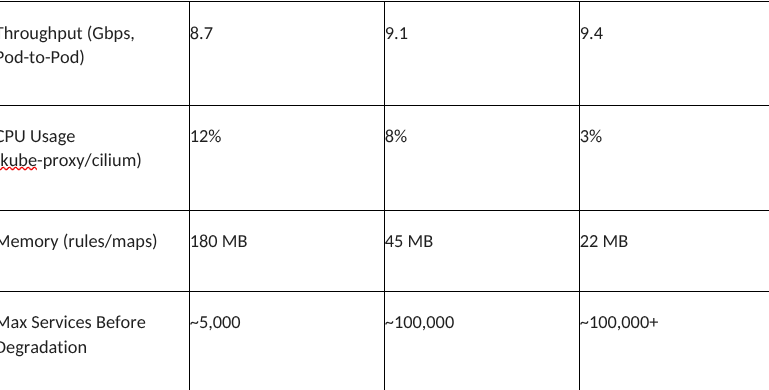
The gap widens dramatically at scale. At 10,000+ Services, iptables becomes a bottleneck; IPVS and eBPF remain stable.
Architecture Decision Guide
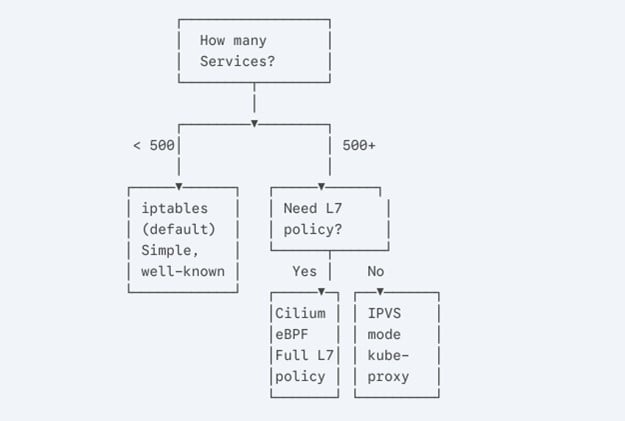
Figure 3: Decision matrix for selecting the appropriate Kubernetes dataplane technology (iptables, IPVS or Cilium eBPF) based on scale and L7 policy requirements.
Choose Iptables If: < 500 Services, Standard Policies, Simplicity Preferred
Choose IPVS if: 500–10,000 Services, need load balancing algorithms, drop-in replacement
Choose Cilium eBPF if: Any scale, need L7 policies, want kube-proxy replacement, performance-critical
Conclusion
Kubernetes networking is not magic; it is Linux networking orchestrated at scale. Every packet traverses real kernel subsystems: Network namespaces, veth pairs, bridges, iptables/eBPF and routing tables.
Understanding these layers transforms debugging from ‘restart everything and hope’ to ‘the packet is being dropped at the iptables FORWARD chain because the NetworkPolicy DNAT rule is missing a port match’.
The next time a Pod cannot reach a Service, do not start by restarting pods. Start with ip route get, conntrack -L and tcpdump. The packet will tell you exactly where it stopped.
