
How to Secure Your Kubernetes Cluster
Here are some key steps for securing Kubernetes clusters
Kubernetes is hot in the DevOps space and is now the third most wanted platform among developers.

The appeal of the platform largely stems from its portability and scalability. Kubernetes defines itself as “a portable, extensible, open-source platform for managing containerized workloads and services that facilitates both declarative configuration and automation.”
Container adoption has surged in recent years, with the “2019 Cloud Native Computing Foundation survey” reporting 84% of their respondents use some type of containerization in production. The same survey also found 78% of respondents use Kubernetes in production, making it a market leader.
With clear benefits and rising adoption, it is critical that the security of Kubernetes is well-understood by any developer implementing this service in their cloud environment. To help developers distill all the information available on this topic, here are some of the key steps for securing Kubernetes clusters.
What Needs To Be Secured?
To start, it may be comforting to point out that a lot of the default configurations and settings in Kubernetes are secure, depending on which tool you use to deploy and which version of Kubernetes you run. For example, using the kubeadm tool to deploy Kubernetes version 1.18 generates a good base for secure default settings.
However, misconfigurations are the biggest risk for cloud environments—and Kubernetes is not immune.
Essentially, any part of a cluster could be abused if accessed by an attacker. Let’s look at some specific steps to ensure your deployments are secure, focusing on the control plane and worker nodes along with the sub-parts within each.
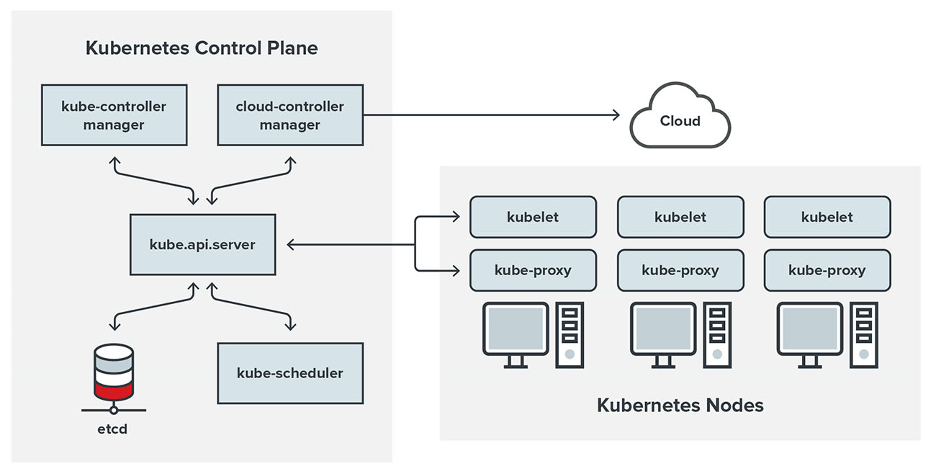
The Control Plane
If you run your clusters using managed services such as Azure Kubernetes Service (AKS), Amazon Elastic Kubernetes Service (Amazon EKS) or Google Kubernetes Engine (GKE), the cloud provider handles control plane security. This is based on the shared responsibility model for cloud. It is still a good idea to make sure your cloud provider is following the recommended security best practices.
However, if you deploy and maintain your own control planes for any compliance- or business-related reason, the security settings must be applied correctly.
The Control Plane serves as the brain that keeps the complex system of worker nodes running. It serves as the main node of your cluster as it manages the worker nodes.
One basic thing that should be done to ensure the control plane remains secure is to perform integrity monitoring for the most critical Kubernetes files. These are files that can affect the entire cluster if compromised. The latest CIS Kubernetes Benchmark v1.5.1 includes a list of the main files and directories that need constant monitoring, along with recommended ownership and permission levels.
There are attackers and bots constantly searching the internet for exposed API servers. It is critical that the kube-apiserver is not left publicly exposed. Although the default setting is secure, exposed API servers are still the main entry point for attackers to compromise a Kubernetes cluster.
Use this curl request to see if your API is public-facing or otherwise: curl https://my-control-plane-ip:6443/api.
Our recommendation for securing API servers is to only allow engineers to access the cluster API via the internal network or corporate VPN.
RBAC authorization is the next step in creating a secure Kubernetes cluster now that access to the API server is restricted. RBAC allows you to configure who has access to what in a cluster. It also allows you to restrict users from accessing the kube-system namespace, which houses all the control plane pods.
The RBAC in Kubernetes is enabled via the kube-api-server when starting it up with the following flag:
–authorization-mode=RBAC
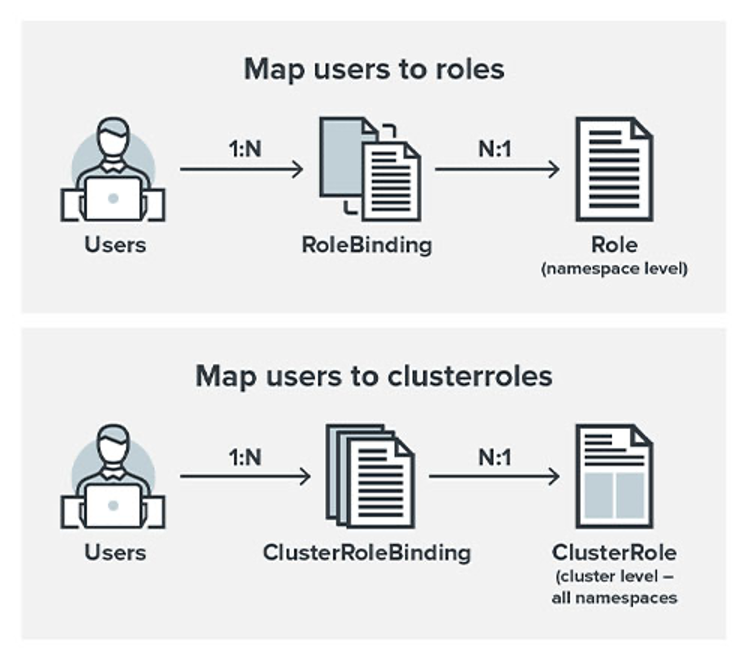
When using RBAC authorization, there are four kinds of API objects that you can use:
- Role. Contains rules that represent a set of permissions within a namespace.
- RoleBinding. Grants the permissions of a Role to one or more users.
- ClusterRole. Contains rules that represent a set of permissions, but it is not tied to a namespace, and it will be applied on the cluster level.
- ClusterRoleBinding. Grants permissions for a ClusterRole to a set of users.
The permissions for the Role and the ClusterRole are usually formed with a combination of a verb and a noun, which represents a Kubernetes object/resource. Some examples include:
- Get Pods
- List Secrets
- Watch ConfigMaps
The etcd is the main data storage location for your cluster, which means all the cluster objects are saved here. Leaving the etcd exposed can potentially leak critical data. Unfortunately, etcd misconfiguration remains rampant—we’ve seen more than 2,600 exposed etcd services on Shodan this year.
The same security principles should be applied to etcd as with any data storage system. Encryption should be implemented in transit and at rest.
To check if your etcd is configured with TLS encryption, type the following command on the control plane host:
ps -ef | grep etcd
Then check if both arguments –cert-file and –key-file are set appropriately.
If they aren’t, you will have to modify the etcd pod specification file located at /etc/kubernetes/manifests/etcd.yaml and set these arguments with their respective file paths, such as:
–cert-file=
–key-file=
The current Kubernetes default installation sets up the proper keys and certificates with TLS encryption for etcd. However, if an attacker somehow bypasses the API server and is able to manipulate objects directly into etcd, it would be the same as having full access to the entire cluster.
By default, the cluster network allows all pods on the same cluster to communicate with each other, including pods from different namespaces, including the kube-system namespace that hosts the control plane pods.
Suppose an attacker is able to deploy a pod into any namespace on your cluster, and that new pod can access all of the pods that manage the Kubernetes cluster located on the kube-system namespace. Can you already see the problem in this situation?
Network policies can help address the issue of open pod communication. A network policy specifies how groups of pods can communicate with each other and with other network endpoints. NetworkPolicy API resources use labels to select pods and define rules that specify what type of traffic is allowed for the selected pods. These policies can help you restrict access between pods or namespaces. All the access can be configured via labels in YAML files, allowing you to block pods from accessing other pods on the kube-system namespace, for example.
Here’s an example of a network policy:
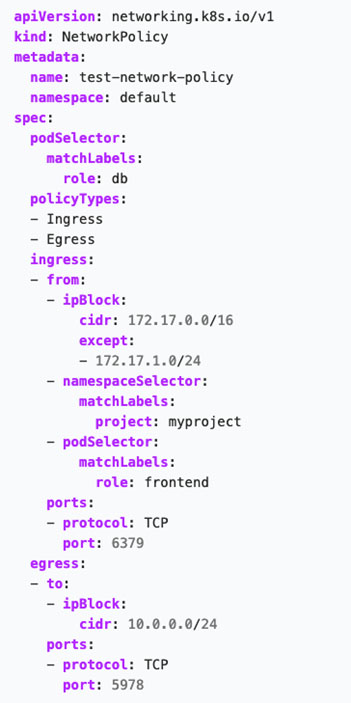
You should also implement a networking solution or a container network interface (CNI) that supports the NetworkPolicy object to ensure it properly affects your cluster.
The Worker Nodes
If the control plane is the brain, worker nodes are the muscle of a cluster. They run and control all the pods and containers in your cluster. While worker nodes are not required, it is not recommended to run and control all pods on the same node as the control plane, so you’ll likely have at least one.
The main components of a node are the kubelet, the container runtime (which is Docker by default) and the kube-proxy. You can see all your nodes (including the master node) by using this kubectl command:
kubectl get nodes.
The kubelet is the agent that runs on each node on your cluster to make sure all containers are running in a pod. Even the Master Node has a kubelet. Restricting permissions and rotating certificates are the main security considerations for the kubelet.
To check for those settings, run the following command on any of your nodes:
ps -ef | grep kube-apiserver

Permissions can be managed by RBAC authorization for kubelets, as well.
Certificates are used by the kubelet agent to authenticate with the API server. They are valid for one year, and it is best to configure the kubelet certification rotation to generate a new key and request a new certificate from the Kubernetes API when the current certificate is nearing expiration.
There are three main steps to ensure the minimum level of security for the pods themselves.
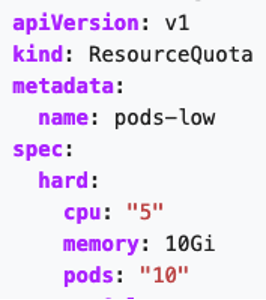
- Limit resources to ensure all pods are able to perform as needed. If one pod starts consuming all the computing resources available, it could cause a Denial of Service (DoS) on the node. ResourceQuotas are the solution, allowing you to set hard and soft resource limits in a namespace.
You can check your kube-apiserver settings with this command:
ps –ef | grep kube-apiserver Here’s a sample of a ResourceQuota object
-
- Create and apply a Security Context to define privilege and access control permissions for a pod or container. A few to always include are:
-
- AllowPrivilegeEscalation – controls whether a process can gain more privileges than its parent process. This should be set to false.
- ReadOnlyRootFileSystem –defines whether the container has a read-only root filesystem or not. The default setting is false, but we recommend that you set it to true.
- RunAsNonRoot –indicates if the container must run as a non-root user and should be set to true. By doing this, in any event that the container tries to run as a root user (UID 0), the kubelet will validate it and fail to start the container.
-
- Create and apply a Security Context to define privilege and access control permissions for a pod or container. A few to always include are:
-
- Use a Linux kernel security feature like Seccomp, AppArmor or SELinux. These can be set up via the Security Context, as well.
- Use a Linux kernel security feature like Seccomp, AppArmor or SELinux. These can be set up via the Security Context, as well.
A Pod Security Policy (PSP) is an object that can control most of the previously mentioned security settings applied on the cluster-level. To create a PSP, you must first enable an admission controller called PodSecurityPolicy, then authorize the user to access it via RBAC by using ClusterRole and ClusterRoleBinding as mentioned above.
Audit logs are an important part of a Kubernetes cluster, as they can record all the requests made to the Kube API Server. Audit logs are disabled by default since they increase memory consumption; however, we highly recommend you enable them before putting your cluster in production. Audit logs will help you detect any security issues and will help your developers with debugging and troubleshooting. To do so, create an Audit Policy object that defines what events to record and which data to collect.
This is a basic Audit Policy example that logs all the request metadata:
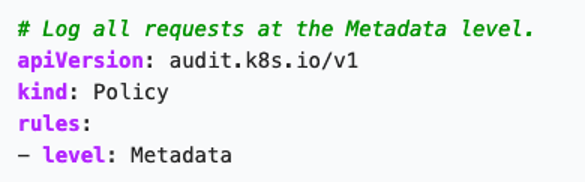
After completing the setup, tell Kubernetes to begin logging by applying the changes to the kube-apiserver.yaml file.
One last thing to remember: If the kube-apiserver is deployed as a pod, you need to mount the hostPath with the location of the log and the policy files. Here’s an example:

Enabling logs and having a proper policy can greatly increase the likelihood of identifying a misconfiguration before a breach occurs IF a person or system is tasked with analyzing them to look for suspicious activity.
Don’t Forget the Basics
All of the above configurations and tweaks are important for maintaining a secure Kubernetes cluster. But amidst all this, don’t forget some basic rules for day-to-day work with Kubernetes:
- Update your Kubernetes environment version early and often: kubectl update. Please apply this on a test environment before applying in production.
- Don’t use the admin user for your daily work, the admin should only be used by CI/CD tools.
- If you can, use managed services such as AKS, EKS and GKE. They usually have better defaults for your security posture and the costs for maintaining the control plane are very low.
- Check out the CIS Kubernetes Benchmark document for more security best practices
For more information and recommendation, visit this Kubernetes security list on GitHub, which contains blogs, articles, tools and videos that discuss tips on hardening Kubernetes deployments.
