
Configuring NVIDIA NeMo Agent Toolkit With Docker Model Runner
2025 has been widely recognized as the year of AI agents. With the launch of frameworks such as Docker cagent, Microsoft Agent Framework (MAF) and Google’s Agent Development Kit (ADK), organizations rapidly embraced agentic systems.
However, one critical area received far less attention: Agent observability.

While teams moved quickly to build and deploy agent-based solutions, a fundamental question remained largely unanswered. How do we know these agents are actually working as intended?
Are multiple agents coordinating effectively? Are their outputs reliable and of high quality?
Can we diagnose failures or unexpected behaviors in complex, multi-agent workflows? These challenges sit at the core of agent observability.
This is where NVIDIA’s open-source toolkit, NeMo, comes into the picture. NeMo brings much-needed, enterprise grade observability to LLM-powered systems, enabling teams to monitor, evaluate and trust their agent infrastructure at scale.
At the same time, Docker Model Runner (DMR) is emerging as the de facto standard for local inference from the desktop. It provides a unified, single pane of glass experience for experimenting with a wide range of open-source models available through the Docker Models Hub.
As part of this tutorial, we will look at how we can add observability to your AI agents when inferencing through DMR.
Docker Model Runner Setup
First, let’s set up DMR using a small language model. In this tutorial, we will use ai/smollm2.
The setup instructions for DMR are available in the official documentation. Follow the steps to get your environment ready.
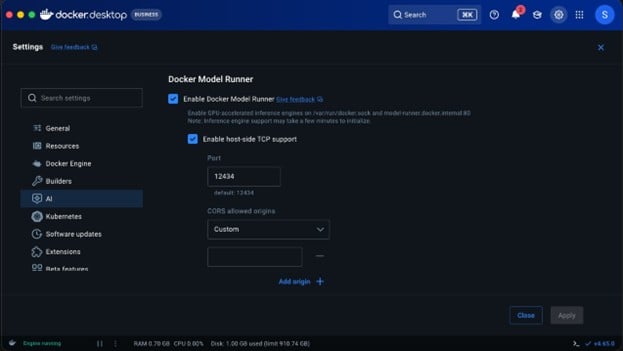
Make sure to enable TCP access in Docker Desktop. This step is essential. Without it, your prototype will not be able to communicate with the model runner over localhost.
Command to pull the small language model we will use for inferencing:
docker model run ai/smollm2
NeMo Agentic Toolkit Setup
The first step begins with installing the NVIDIA NAT package from Python. I recommend installing UV and all the nat dependencies through UV because going down the plain pip route causes time-outs.
uv pip install nvidia-nat
NeMo agentic setup is done through YAML. So, declare a YAML configuration. For example: agent-run.yaml functions:
# Add a tool to search wikipedia wikipedia_search:
_type: wiki_search
max_results: 2
llms:
# Tell NeMo Agent Toolkit which LLM to use for the agent openai_llm:
_type: openai model_name: ai/smollm2
base_url: http://localhost:12434/engines/v1 # Docker model runner endpoint
api_key: “empty” // because we are using local inference this can be empty.
temperature: 0.7
max_tokens: 1000
timeout: 30
general: telemetry:
tracing: otelcollector:
_type: otelcollector
# The endpoint where you have deployed the otel collector endpoint: http://0.0.0.0:5216/v1/traces
project: nemo_project
workflow:
# Use an agent that ‘reasons’ and ‘acts’
_type: react_agent
# Give it access to our Wikipedia search tool tool_names: [wikipedia_search]
# Tell it which LLM to use (now using OpenAI with Docker endpoint) llm_name: openai_llm
# Make it verbose verbose: true
# Retry up to 3 times parse_agent_response_max_retries: 3
There are four important sections in the YAML file:
- Functions: These are simple components that perform a specific operation. In this case, built-in Wikipedia search for example. You can define your own functions too.
- LLMs: We plan to use several LLM providers. Currently, OpenAI, Anthropic, Azure OpenAI, Bedrock, and Hugging Face are supported. We can leverage DMR for any of these providers because it supports both OpenAI and Anthropic API formats.
- Telemetry: This is where observability comes into the picture. In this example, we have added OTel-based tracing. As a result, we will see spans being logged to the OpenTelemetry-configured destination.
- Workflow: This is the final piece in the puzzle, where we will end up configuring all the functions, LLMs and tools to create a workflow.
For the current workflow, we are configuring a reasoning and act agent along with the Wikipedia search tool and DMR inference endpoint.
Before we run the workflow, we will configure the OpenTelemetry exporter to publish spans to otellogs/span folder.
Create a file named otel_config.yml:
receivers: otlp:
protocols: http:
endpoint: 0.0.0.0:5216
processors: batch:
send_batch_size: 100 timeout: 10s
exporters: file:
path: /otellogs/spans.json format: json
service: pipelines:
traces:
receivers: [otlp] processors: [batch] exporters: [file]
Run the following command in the terminal:
mkdir otel_logs chmod 777 otel_logs docker run -v
$(pwd)/otelcollectorconfig.yaml:/etc/otelcol-contrib/config.yaml \
-p 5216:5216 \
-v $(pwd)/otel_logs:/otel_logs/ \ otel/opentelemetry-collector-contrib:0.128.0
Finally, run the NeMo workflow using the following command:
nat run –config_file ./agent-run.yml –input “What is the capital of Washington”
Output:
[AGENT]
Agent input: What is the capital of Washington Agent‘s thoughts:
WikiSearch: {‘annotation‘: ‘Washington State‘, ‘required‘: False}
Thought: You should always think about what to do.
Action: Wikipedia Search: {‘annotation‘: ‘Washington State‘, ‘required‘: False}
2026-03-22 21:55:18 – INFO –
nat.plugins.langchain.agent.react_agent.agent:357 – [AGENT] Retrying ReAct Agent, including output parsing Observation
2026-03-22 21:55:18 – INFO – httpx:1740 – HTTP Request: POST
http://localhost:12434/engines/v1/chat/completions “HTTP/1.1 200 OK” 2026-03-22 21:55:18 – INFO –
nat.plugins.langchain.agent.react_agent.agent:270 –
[AGENT]
Agent input: What is the capital of Washington State? Agent’s thoughts:
The capital of Washington State is Olympia.
After running the above command, you will see that there is a spans.json file under the otel_logs section, which will have the entire span printed out along with inputs and outputs.
In addition to what we discussed, it is also possible to set up logging and evaluations on model response that check for coherence, relevance and groundedness.
