
kpack: Kubernetes-Native Build Automation With CI/CD Integration
Kubernetes has become the de facto platform for cloud-native applications; however, building container images and keeping them updated can be challenging. In CNCF’s 2023 survey, 40% of the organizations reported security as the leading challenge in using or deploying containers.
Open-source kpack is a Kubernetes-native tool that automates container image builds using Cloud Native Buildpacks. Buildpacks abstract away the complexities of container builds by automating best practices, which not only streamlines the build process but also enhances security by reducing the risk of bloated images and non-root containers. Buildpacks’ base images are maintained by the community and are also always up-to-date with the latest CVEs patched.

kpack extends your cluster with custom resources (CRDs) for image building, leveraging unprivileged Kubernetes primitives to perform builds and keep application images up-to-date. This means that you can simply push code to a repo and let kpack manage the heavy lifting of producing a container image.
What makes kpack particularly powerful for CI/CD pipelines is its ability to auto-rebuild images when source code changes or when base images and buildpacks are updated. This ensures that your apps are always rebuilt with the latest security patches and dependencies without manual intervention. In this hands-on tutorial, we’ll walk through setting up kpack step by step.
Installing kpack on Your Kubernetes Cluster
Let’s start by installing kpack. In this tutorial, I assume that you have a running Kubernetes cluster. kpack is distributed as a set of Kubernetes controllers and CRDs. Download the latest release-<version>.YAML file from the release page. This YAML contains all the kpack CRD definitions and controller deployments.
Apply the manifest to the cluster by using kubectl to install kpack. For example, if the latest version is v0.16.1 (at the time of writing), you should run:
kubectl apply -f release-0.16.1.yam
Verify the installation by ensuring that the kpack pods are running:
kubectl get pods -n kpack
With kpack installed, we can configure it to start building images.
Configuring kpack for Automated Builds
kpack operates by declaring what to build and how to build it, all through Kubernetes resources. We need to configure a builder and an image. We also need to provide credentials for kpack to access our source code and push the built image to a registry.
Create a Kubernetes Secret with your credentials. For example, for Docker Hub, you can create a secret by running:
kubectl create secret docker-registry registry-credentials \
–docker-server=https://index.docker.io/v1/ \
–docker-username=<YOUR_USERNAME> \
–docker-password=<YOUR_PASSWORD> \
–docker-email=<YOUR_EMAIL> \
-n default
This will create a secret named registry-credentials in the default namespace containing your Docker config. kpack will use this to push the built image. Next, link this secret to a service account that kpack will use. For simplicity, we can use the default service account in the namespace. Run:
kubectl patch serviceaccount default -p ‘{“imagePullSecrets”: [{“name”: “registry-credentials”}]}’ -n default
This attaches our registry creds to the default service account. When kpack builds and pushes the image, it will use these credentials.
Defining a Build Environment
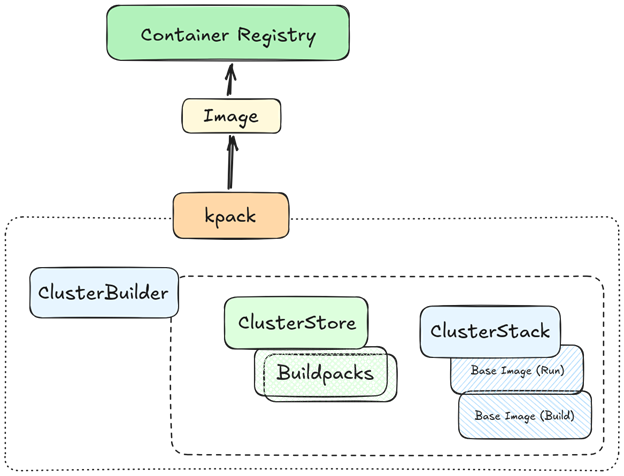
Kpack uses the Cloud Native Buildpacks system, which separates the build environment (builder image, buildpacks and base OS stack) from your application code. We need to configure a ClusterStack and base images for the build and run and a ClusterStore — the collection of buildpacks to use. Then we’ll create a ClusterBuilder that brings them together.
Let’s create a ClusterStack that defines the build-time and run-time base images. For example, we can use the open-source Paketo Buildpacks base stack. Create a YAML file clusterstack.yaml:
apiVersion: kpack.io/v1alpha2
kind: ClusterStack
metadata:
name: paketo-stack
spec:
id: “paketo-jammy-base”
buildImage:
image: paketobuildpacks/build-jammy-base:latest
runImage:
image: paketobuildpacks/run-jammy-base:latest
This declares a stack using Paketo’s Jammy base images for the build and run phases. Apply this with kubectl apply -f clusterstack.yaml.
Now, let’s create the ClusterStore that lists the available buildpacks. For example, if we want to build a Node.js app, we can include Paketo buildpacks for Node.js and Java. Create clusterstore.yaml:
apiVersion: kpack.io/v1alpha2
kind: ClusterStore
metadata:
name: paketo-store
spec:
sources:
– image: http://gcr.io/paketo-buildpacks/java
– image: http://gcr.io/paketo-buildpacks/nodejs
Finally, let’s create a ClusterBuilder that combines the stack and store with an ordering of buildpacks. Create clusterbuilder.yaml:
apiVersion: kpack.io/v1alpha2
kind: ClusterBuilder
metadata:
name: demo-builder
spec:
tag: <YOUR_REGISTRY>/demo-builder:latest
stack:
name: paketo-stack # use the ClusterStack defined above
kind: ClusterStack
store:
name: paketo-store # use the ClusterStore defined above
kind: ClusterStore
order:
– group:
– id: paketo-buildpacks/nodejs
– group:
– id: paketo-buildpacks/java
Apply the ClusterStore and ClusterBuilder resources:
kubectl apply -f clusterstore.yaml
kubectl apply -f clusterbuilder.yaml
After a moment, kpack will assemble the builder. You can check the status with:
kubectl get clusterbuilder demo-builder -o yaml
It should eventually show the status Ready=True and list the buildpacks included.
Creating an Image Resource for Your Application
With the builder in place, the final step is to tell kpack what to build. We do this by creating an image resource, which links a source-code repo to our builder and a destination image. Create image.yaml for your app:
apiVersion: kpack.io/v1alpha2
kind: Image
metadata:
name: sample-app-image
namespace: default
spec:
tag: <YOUR_REGISTRY>/sample-app:latest
serviceAccount: default
builder:
name: demo-builder
kind: ClusterBuilder
source:
git:
url: https://github.com/<YOUR_USERNAME>/<YOUR_APP_REPO>.git
revision: main
A few things to note in this spec:
- tag: The container image name (and tag) that will be produced — this should point to your registry. Kpack will push the built image here.
- serviceAccount: The account with credentials for the abovementioned registry
- builder: Which builder to use — we reference the ClusterBuilder we created (demo-builder)
- source: The location of your application source code
Apply the image resource:
kubectl apply -f image.yaml
Once you apply this, kpack takes over. Behind the scenes, the kpack controller will fetch the source from the Git repo, detect the correct buildpack(s) to use and start a build pod to build the image. This first build might take a few minutes as it downloads buildpack dependencies and base images. You can watch the progress by checking the kpack builds:
kubectl get builds -o name
kubectl logs build/sample-app-image-build-1 -c build-step-build -f
When the build is complete, kpack will push the new container image to the registry as specified by spec.tag. Congratulations — you have an automated pipeline from source code to container image! And kpack will continuously check for updates. If you commit new code to the repository on the specified branch, kpack will detect the change and automatically trigger a new image build. It also watches for builder or stack updates — for example, if a new base image with security fixes becomes available, kpack can rebuild the image with the new base, ensuring that your app is always up to date.

Putting it all Together
The beauty of kpack is that it transforms the image build process into a Kubernetes-native, declarative workflow — a great complement to GitOps and Kubernetes-focused workflows. For example, by pairing kpack with Argo CD, you get a powerful separation of concerns — image building is handled by kpack and deployments are handled by Argo CD. You can also integrate kpack with pipeline engines like Tekton or GitHub Actions, allowing you to insert kpack into more traditional CI/CD flows and ensuring that even if you run tests or other steps in your pipeline, the final container build is performed consistently. Happy building with kpack!
